Maybe you are wondering why a Delphi developer would be interested in Java and Java EE? Well...
On the Desktop
Most people think that Delphi the object Pascal-based development tool died some time ago, but in fact it is alive and well over at Embarcadero. However, it did go through some uncertain times when Borland, its creators, seemed to lose interest in software development tools. Following Microsoft's .Net platform release back in 2002, many Delphi developers began switching to Visual Studio and Microsoft's C# language which in fact was created by Anders Hejlsberg, the original architect of Delphi who had moved from Borland to Microsoft in the 1990s.
However, unlike Visual Basic programmers who had no automatic upgrade path to .Net, Delphi provided cross-compatability so you could re-compile your Delphi software for .Net with minimal changes. So there was no really urgent need for Delphi programmers to migrate, and I never have. (That cross-compatability was later dropped, however, with the introduction of Delphi Prism which is a plug-in for Visual Studio which allows you to use a version of the Delphi language instead of C#.)
The hype surrounding .Net when it first came out suggested that it would replace native development on the Windows platform. Yet eight years later, with Windows 7, even Microsoft is still developing in native code. I still cannot see a reason to develop desktop applications in .Net, I have not yet found myself unable to do in Delphi what others are doing in Visual Studio. Partly because Embarcadero have continued to develop Delphi so it is not left behind.
On the Web
When it comes to web development, however, I was initially attracted by ASP.NET because it seemed to offer me an easier migration. But the big stumbling block for me is the lack of cross-platform compatibility because although Windows predominates on the desktop, the predominant internet server platform is Apache. Yes, there is the Mono project, but because it is not directly supported by Microsoft it has a tendency to lag behind .Net releases. And why make my potential clients pay for a Microsoft server when there are free open-source alternatives?
So I started looking at Java, mainly because I like the language, its object-orientation, type safety and so on. That lead to looking at Java EE and all the development frameworks available for it, for example Spring. The "problem" with Java, it seems to me, is that there is probably too much choice, and not enough plain-English explanation. It sometimes seems like Java developers have developed their own secret language, and each of them has created their own framework. Finding my way around this maze has taken a very long time.
Essentially, the choice for me was the Microsoft web development framework, ASP.NET, which has taken a while to mature, for example it initially lacked an MVC framework, or a Java EE framework. So far I am leaning towards Java EE, and I am attracted by the simplicity of a framework like Click, but I still have concerns about how easy it will be for my clients to deploy a Java EE server. For that reason I am also dabbling with writing web applications in Delphi, using the Indy web server components. Stay tuned!
Experiments in IT
Messing around with Delphi, NetBeans, Java EE and anything else that takes my fancy
Monday, 30 August 2010
Friday, 27 August 2010
Google AppEngine, Apache Click and NetBeans - Part 2
I have finally managed to get my Hello World application working with Apache Click on AppEngine.
See my previous post which explains how to obtain and compile the latest click libraries here. I did that because I eventually want to try out the ClickClick extensions for Click and their documentation says you need Click Version 2.3.0. However, I am starting to question that, because other parts of the documentation seem out of date.
I am using NetBeans 6.9 with the NBAppEngine plugin. You need to have the AppEngine SDK installed, too.
1. Start a new project using File -> New Project and select category Java Web and project Web Application
2. In the second step, give your project a name, and click next to go to the third step. From the list of servers choose Google App Engine.
3. You do not need to select any frameworks in step 4. When you click Finish your project should look like the one below.
4. To make this a Click project, add the click libraries. Right-click on the Libraries folder and select Add JAR/Folder and select click-2.3.0-M1.jar and click-extras-2.3.0-M1.jar from wherever you saved them.
5. In the Web Pages\WEB-INF folder create a new XML document called click.xml. Later we will create the helloworld.htm view, and the controller class HelloWorld.
<?xml version="1.0" encoding="UTF-8"?> <!DOCTYPE click-app PUBLIC "-//Apache Software Foundation//DTD Click Configuration 2.2//EN" "http://click.apache.org/dtds/click-2.2.dtd"> <click-app> <pages> <page path="helloworld.htm" classname="clicktest.HelloWorld"/> </pages> <mode value="debug"/> </click-app> |
6. Edit the web.xml file
| <?xml version="1.0" encoding="UTF-8"?> <web-app version="2.5" xmlns="http://java.sun.com/xml/ns/javaee" id="" xmlns:xsi="http://www.w3.org/2001/XMLSchema-instance" xsi:schemaLocation="http://java.sun.com/xml/ns/javaee http://java.sun.com/xml/ns/javaee/web-app_2_5.xsd"> <session-config> <session-timeout> 30 </session-timeout> </session-config> <listener> <listener-class>org.apache.click.extras.gae.GoogleAppEngineListener</listener-class> </listener> <servlet> <servlet-name>ClickServlet</servlet-name> <servlet-class>org.apache.click.ClickServlet</servlet-class> <load-on-startup>0</load-on-startup> </servlet> <servlet-mapping> <servlet-name>ClickServlet</servlet-name> <url-pattern>*.htm</url-pattern> </servlet-mapping> <welcome-file-list> <welcome-file>helloworld.htm</welcome-file> </welcome-file-list> </web-app> |
7. Edit the appengine-web.xml file to exclude *.htm files from the list of static file types. See the click documentation for the GoogleAppEngineListener class for more details.
<?xml version="1.0" encoding="UTF-8"?> <appengine-web-app xmlns="http://appengine.google.com/ns/1.0" xmlns:xsi='http://www.w3.org/2001/XMLSchema-instance' xsi:schemaLocation='http://kenai.com/projects/nbappengine/downloads/download/schema/appengine-web.xsd appengine-web.xsd'> <application>ClickTest</application> <version>1</version> <!-- Exclude *.htm files from being served as static files by GAE, because the *.htm extension is mapped to ClickServlet. --> <static-files> <exclude path="**.htm" /> </static-files> </appengine-web-app> |
8. In Web Pages, delete index.jsp and create helloworld.htm. The body of the page should look like this:
<body> <h2>Hello World</h2> Hello world from Click at $time </body> |
9. Create a new package clicktest with a class HelloWorld
package clicktest; import java.util.Date; import org.apache.click.Page; public class HelloWorld extends Page { private Date time = new Date(); public HelloWorld() { addModel("time", time); } } |
Labels:
Apache Click,
AppEngine,
Java EE,
NetBeans
Wednesday, 25 August 2010
Google AppEngine, Apache Click and NetBeans - Part 1
I like the look of Java and J2EE for Web Development, but there are so many frameworks, standards and other clutter getting in the way of getting to grips with it. Coming from a Delphi background where everything has a lovely graphical interface and all the messy details are nicely hidden, trying to get to grips with Java is hard.
To make life even harder for myself, I have rejected Eclipse in favour of NetBeans because I find it more intuitive and responsive to use. However, most Java examples and tutorials assume you are using Eclipse.
Anyway, I am plowing on regardless and want to try out ClickClick on Google AppEngine. The first step is to compile Apache Click from source. Here is how I did it:
I am using NetBeans 6.9 with the NBAppEngine plugin
1. Use the subversion support in NetBeans to get the source code. If you do not have the subversion plugin installed, NetBeans will prompt you to install it and re-start the IDE.
2. Enter the URL of the Click subversion repository: http://svn.apache.org/repos/asf/click/trunk/click and click the Next button
3. Select the Local Folder where you want to save the files, I have chosen a folder called "3rdParty". Working Copy shows where the files will be saved. Now click Finish.
4. NetBeans will download the source and when it is finished will ask you if you want to create a project for it. Say yes, click "Create Project".
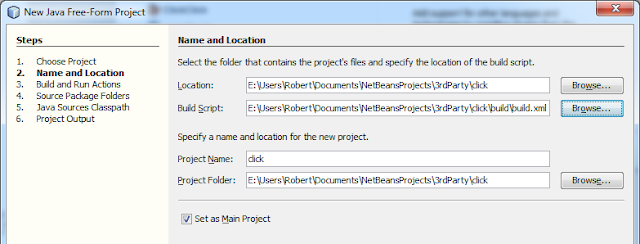
5. For the project type, select Java Free-Form Project
6. Select the location of the files you downloaded in step 3. The build file is ...click\build\build.xml. The project name and location are filled in by NetBeans.
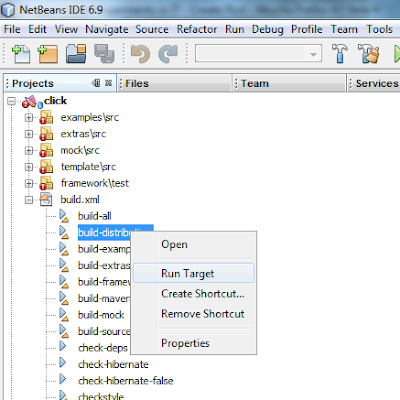
7. You should now have a project called "click" and if you expand the build file, you can see the various tasks included in it. I right-clicked on "build-distribution" and selected Run Target. To my amazement it worked!
8. My 3rdParty\click\dist folder now contains the four files I need to build clickclick: click-2.3.0-M1.jar, click-extras-2.3.0-M1.jar, click-mock-2.3.0-M1.jar and click-nodeps-2.3.0-M1.jar.
Labels:
Apache Click,
AppEngine,
Java EE,
NetBeans
Experiment 1 - Blogger Template Tweak
I have a wide screen, as many people do, and I was puzzled that most Blogger templates use a fixed width for the main body of the blog. Obviously some elements must be fixed width, ad sense, for example, but I wanted my posts to take up as much space as there is available.
So, I looked at the HTML for my template and changed the following section from "$(content.width)" to "80%" for both max-width and _width.
.content-outer, .content-fauxcolumn-outer, .region-inner {
min-width: $(content.width);
max-width: 80%;
_width: 80%;
}
So, I looked at the HTML for my template and changed the following section from "$(content.width)" to "80%" for both max-width and _width.
.content-outer, .content-fauxcolumn-outer, .region-inner {
min-width: $(content.width);
max-width: 80%;
_width: 80%;
}
Labels:
Blogger
Subscribe to:
Comments (Atom)


